Applying Permissions to the Application
2 minute read
Once you have registered and configured an authentication method for your Azure application, API permissions must be assigned to the application to allow access to specific data types within Microsoft Office 365.
To apply the required API permissions to the application:
-
Access the Overview page of your newly created application.
Tip
To access this page from the Azure portal Home page, select Azure Active Directory from the home page then App registrations from the left navigation panel. Finally, click on the name of the new application to access its Overview page. -
Select API permissions from the left navigation panel and then click Add a permission.
-
From the list of Commonly used Microsoft APIs, select Microsoft Graph.
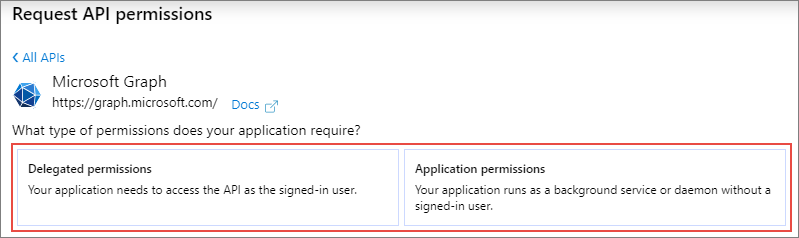
-
Click Delegated permissions and then select the following permission:
| API/Permission Name | Type | Description |
|---|---|---|
Chat.Read |
Delegated | Read user chat messages |
Group.Read.All |
Delegated | Read all groups |
Mail.Read |
Delegated | Read user mail |
User.Read.All |
Delegated | Read all users' full profiles |
- Return to the top of the page and click Application permissions to change the permission type, then select the following permissions:
| API/Permission name | Type | Description |
|---|---|---|
Calendars.Read |
Application | Read Calendars in all mailboxes |
Channel.ReadBasic.All |
Application | Read the names and descriptions of all channels |
ChannelMember.Read.All |
Application | Read the members of all channels |
ChannelMessage.Read.All |
Application | Read the chat messages from all channels |
ChannelSettings.Read.All |
Application | Read the names, descriptions, and settings of all channels |
Chat.Read.All |
Application | Read all chat messages |
Contacts.Read |
Application | Read contacts in all mailboxes |
Directory.Read.All |
Application | Read directory data |
Files.Read.All |
Application | Read files in all site collections |
Group.Read.All |
Application | Read all groups |
Mail.Read |
Application | Read mail in all mailboxes |
OrgContact.Read.All |
Application | Read organizational contacts |
Sites.Read.All |
Application | Read items in all site collections (preview) |
User.Read.All |
Application | Read all users' full profiles |
-
After all the specified API permissions have been selected, click Add permissions from the bottom of the view to apply the selections.
-
The newly added API permissions are initially displayed with a Not Granted status. Click Grant admin consent for <AD Tenant name> to update the status.
Note
By granting admin consent, the Service Principal account for the selected AD tenant is granted access to the selected API permissions. The defined application permissions provide access to specific data contained within Microsoft Teams, Exchange, and SharePoint. -
Proceed to the next topic to request access to the protected APIs.
Feedback
Was this page helpful?
Thank you for your feedback.
Thank you for your feedback.