Organizations Overview
13 minute read
The Organizations feature enables system administrators to manage multiple entities within a single portal. Within the application, the word organization refers to a single entity with its own administrators, users, and cases.
An organization can be a provider, a client, or a standalone organization.
- A provider organization can have one or more child organizations, called clients. A provider and its clients are said to be linked.
- Client organizations cannot have clients of their own.
- An organization cannot be both a provider and a client.
- A standalone organization has no clients and has not been designated as a provider. It can potentially become either a provider or a client.
Organizations are managed on the Portal Management > Organizations page.
Organizations security overview
When organizations security is not enabled, only system administrators can access Organizations.
In general, when organizations security is enabled:
- Portal administrators who are members of a provider organization can access the Organizations feature.
- Portal administrators can manage only the cases and users associated with their organization or linked client organizations.
- Users can be assigned to only the cases associated with one of their organizations.
Note
For a summary of how organizations security affects portal access for each user category, see the Portal security table.To enable organizations security:
- On the Portal Home page, under Portal Management, click Settings.
- On the Portal Options page, select Enable organizations security.
View organizations
On the Organizations page, administrators can view the number of cases, users, file repositories, and servers assigned to organizations, and add or delete organizations.
Unless organizations security is enabled, only system administrators can access the Organizations page. The items that appear in the list on the Organizations page for portal administrators will vary depending on portal administrator membership, if any, in provider or client organizations.
To view organizations:
- On the Portal Home page, under Portal Management, click Organizations.
- To view linked client organizations, click the plus sign next to a provider organization.
Add and delete organizations
Add an organization as a top-level, or provider, organization, or as a client linked to a provider organization. You can also add a standalone organization that is neither a provider nor a client.
To add an organization:
-
On the Portal Home page, under Portal Management, click Organizations.
-
On the Organizations page, click Add.
-
In the Add an organization dialog box, type the Name of the organization, and if necessary, specify the organization as a provider or client organization.
- If you define an organization as a provider by selecting Enable organization as a provider, you can assign other organizations to it as clients.
- If you add an organization as a client, select the provider from the Assign as a client of provider list.
Note
An organization cannot be both a client and provider.
-
To relate organizations to other assets, add an optional Account number.
-
To run the case finalization script after creating, cloning, or connecting to a case for this organization, select Use case finalization. For this option to be available, case finalization must be configured. For more information, see Manage case finalization scripts in the Nuix Discover documentation.
Note
If this organization is a client and its provider has case finalization enabled, this option is selected by default, but can be cleared. -
Click Save.
-
To delete an organization, select the organization on the Organizations page and click Delete.
The delete operation removes the user and case links from the organization, but does not remove the users and cases from the application.
Note
You cannot delete a provider organization with linked client organizations.
Edit organization properties
To edit organization properties:
-
On the Portal Home page, under Portal Management, click Organizations.
-
On the Organizations page, click the name of an organization.
The Properties page appears.
-
To change the name of an organization, type in the Name box.
-
To make a client organization a standalone organization, select None in the Client of provider list. To make the organization a provider, select Enable organization as a provider.
Note
When you change the provider or client status, be aware that other users, including portal administrators, may no longer have access to cases in the organization. -
Select an IP address rule set in the Default IP address rule list to assign the rule set to any new cases created for the organization. If organizations security is on, all IP address rule sets assigned to the organization appear in the list. If organizations security is not on, all existing IP address rule sets appear in the list. For more information, see Work with IP address rules in the Nuix Discover documentation.
-
In the Default identity provider list, select an identity provider.
Note
When creating a new user in this organization, the identity provider setting for the user defaults to the selected value. -
In the Default case template for cloning list, select a case.
-
You can perform the following actions using the value in the Account number box.
- To edit the existing account number for either the provider or client organization, change the value in the Account number box.
- If the organization is a client, and an account number exists for the provider, Inherited from provider appears in the Account number field. You can add a different number and make the names for the client cases independent from the provider organization case names.
- When an accurate value is present in the Account number box, select Name cases automatically using the account number to add the account number and case number as a prefix for case names.
Note
The case numbers start with C001, or the next sequential number if this scheme is already in use. The application automatically names new cases created in this provider organization or its client organizations with a prefix of the account number, followed by the sequential case number, followed by the new case name. For example, the name of the first case added for the organization with the account number HNN64 might be HNN64C001_NewCase. The case number is not reused if a case is deleted.
-
To run the case finalization script after creating, cloning, or connecting to a case for this organization, select Use case finalization.
Note
Case finalization must be enabled and configured to provide access to this option. For more information, see Manage case finalization scripts in the Nuix Discover documentation. -
To set default servers for an organization, select the following values in the Servers section. Note: The lists do not populate by default. The options in these lists include the servers that appear on the Servers page for an organization.
- Database server: Select database servers that you have permission to access.
- Analysis server: Select analysis servers that you have permission to access.
-
To set default file repositories for an organization, select the following values in the File repositories section.
- Image: Select an image or index repository from the list.
- Index file: Select an image or index repository from the list.
- File transfer: Select an image or index repository from the list.
- Archive: Select an archive repository from the list.
- External: Select an external repository from the list.
-
Click Save.
Assign or unassign cases to an organization
Assign or unassign cases to an organization on the Cases page. You can assign a case to only one organization.
Note
Only system administrators can assign and unassign cases from this page.To assign or unassign cases for an organization:
- On the Portal Home page, under Portal Management, click Organizations.
- On the Organizations page, click the name of an organization.
- In the navigation pane, click Cases.
- Click Assign cases.
- To assign cases to an organization, do the following:
- Select cases from the list.
Note
For portal administrators, assigning a case unassigns it from its current organization and assigns it to the new organization. System administrators can only assign cases that are not assigned to another organization. - Click Save.
- Select cases from the list.
- To unassign cases from an organization, do the following:
- Select the cases.
- Click Unassign cases.
Warning
Users in the organization who are assigned to this case will no longer be able to access this case. - Click OK.
Assign or unassign users to an organization
Assign or unassign users to an organization on the Users page. Portal administrators can be associated with only one organization. Portal users can be associated with multiple organizations. When organization security is enabled, users can be assigned to only cases that are assigned to one of their organizations.
Note
Portal administrators are not able to unassign a user from an organization if it is the only organization to which the user is assigned. Unassigning users does not affect their association with other organizations.To assign or unassign users for an organization:
- On the Portal Home page, under Portal Management, click Organizations.
- On the Organizations page, click the name of an organization.
- In the navigation pane, click Users.
- Click Assign users.
- To assign users to an organization, do the following:
- Select users from the list. The Organizations column displays the first organization, alphabetically, that this user is already assigned to.
- To view a list of organizations to which this user is assigned, hover over the number to the right of the Organizations column.
- Click Save.
- To unassign users from an organization, do the following:
- Select the users.
- Click Unassign users.
- Click OK.
Assign or unassign file repositories to an organization
File repositories can be assigned to multiple organizations. Administrators can control the allocated file repositories by organization. Portal administrators can create cases using only one of their organization’s assigned file repositories. If a portal administrator belongs to a provider organization, the administrator can choose from file repositories assigned to any one of the provider organization’s client organizations.
Assign or unassign file repositories on the File Repositories page
Note
Portal administrators cannot unassign file repositories from their own provider organizations.To assign or unassign file repositories:
- On the Portal Home page, under Portal Management, click Organizations.
- On the Organizations page, click the name of an organization.
- In the navigation pane, click File Repositories.
- Click Assign repository.
- To assign repositories, do the following:
-
Select file repositories from the list.
The Organizations column displays the first organization, alphabetically, that the file repository is assigned to.
-
To view a list of the organizations who can access this file repository, hover over the number on the right of the Organization column.
-
Click Save.
-
- To unassign a file repository,do the following:
- Select the file repository.
- Click Unassign repository.
- Click OK.
Assign or unassign servers to an organization
Servers can be assigned to multiple organizations. Administrators can control the allocated servers by organization. Portal administrators can create cases using only one of their organization’s assigned servers. If a portal administrator belongs to a provider organization, the administrator can choose from servers assigned to any one of the provider organization’s client organizations.
Assign or unassign servers on the Servers page
Note
Portal administrators cannot unassign file repositories from their own provider organizations.To assign or unassign servers:
- On the Portal Home page, under Portal Management, click Organizations.
- On the Organizations page, click the name of an organization.
- In the navigation pane, click Servers.
- Click Assign server.
- To assign servers,do the following:
-
Select servers from the list.
The Organization column displays the first organization, alphabetically, that this server is assigned to.
-
To view a list of the organizations who can access this server, hover over the number to the right of the Organizations column.
-
Click Save.
-
- To unassign a server,do the following:
- Select the server.
- Click Unassign server.
- Click OK.
Apply indexing and content file settings to an organization
System administrators can apply indexing and content file settings individually for any organization. These settings override the existing portal default settings. Portal administrators can apply the settings for their organizations or their client organizations.
To apply indexing and content file settings:
-
On the Portal Home page, under Portal Management, click Organizations.
-
On the Organizations page, click the name of an organization.
-
In the navigation pane, click one of the following:
- Content: File Type Rank
- Indexing: Options
- Indexing: Noise Words
- Indexing: Alpha Standard
- Indexing: Alpha Extended
The fields on each page are the same as the corresponding fields for the pages in Portal Management > Settings.
Note
If you change the indexing and content file settings for an organization, the settings apply to newly created cases. Existing cases are not affected.
Schedule daily case metrics jobs for an organization
System administrators can schedule daily case metrics jobs for organizations and all cases in those organizations.
Note
When you schedule a daily case metrics job to run on the last day of the month, the job includes the same stages as a full Gather case metrics job. For information about Gather case metrics jobs, see Add jobs in the Nuix Discover documentation.Note
This feature is not available to portal administrators.To schedule daily case metrics jobs for an organization:
-
On the Portal Management > Organizations page, on the toolbar, click Case metrics.
-
In the Case metrics settings dialog box, in the Time list, select a time.
Note
The time appears in the user’s local time. -
Select one or more organizations.
-
Click Save.
The jobs are scheduled to run daily, at the time you selected. The newly scheduled jobs are added to all existing cases for the selected organization or organizations. For cases that are added to an organization after the job has been scheduled, the settings for the organization apply.
Note
These settings do not override previously scheduled jobs.After you schedule a daily case metrics job, an icon appears in the second column in the table on the Portal Management > Organizations page, as shown in the following figure. This icon indicates that daily case metrics jobs are enabled for all cases in the organization.
Note
This column is visible only to system administrators.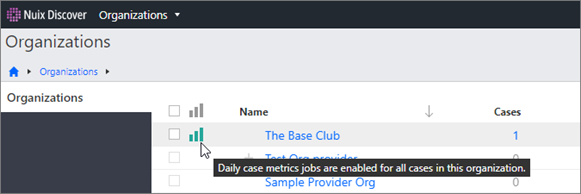
Once the daily case metrics jobs are complete, the values in the following columns are updated on the Portal Management > Reports > Hosted Details page:
- Base documents (GB)
- Production renditions (GB)
- Databases (GB)
- Elasticsearch (GB)
- Content index (GB)
- Predict (GB)
The values in the following columns on the Portal Management > Reports > Hosted Details page are not updated as part of a scheduled daily case metrics job. Rather, the values in these columns reflect the values from the last Gather case metrics job that was run:
- Orphan (GB)
- File transfer data (GB)
- Archive missing (GB)
- Missing (GB)
To update these values, you must run a full Gather case metrics job on the Portal Management > Processing > Jobs page.
Change case metrics jobs for an organization
When you change the case metrics settings for an organization, a banner appears at the top of the page. While the scheduled jobs are being saved for the cases in the organizations, the following text appears in the banner: Daily metrics are being saved for organizations. The banner no longer appears after all jobs are saved.
Warning
You can continue working while the jobs are being saved, but do not log out of Nuix Discover until the banner no longer appears.The time that it takes for the jobs to finish saving depends on the size of your environment.
Cancel daily case metrics jobs for an organization
To cancel daily case metrics jobs:
- On the Portal Management > Organizations page, on the toolbar, click Case metrics.
- In the Case metrics settings dialog box, clear the check box for the selected organization or organizations.
- Click Save.
Feedback
Was this page helpful?
Thank you for your feedback.
Thank you for your feedback.