Access and Use the Connect API Explorer
5 minute read
The application contains an interactive API explorer that allows you to explore the schema, format and run queries and mutations, and view responses.
Note
Your administrator must grant permissions for you to access the Connect API Explorer page. For more information, see Grant access to the Connect API Explorer.The Connect API Explorer includes schema validation, so you can test a query or mutation before embedding it into a third-party application. It also includes the OneGraph GraphiQL Explorer plug-in, which is a query builder that assists users, both new and advanced, in quickly and easily generating queries and mutations with a graphical representation of the data fields and objects, and helps avoid the frustration of incorrect syntax.
The Connect API Explorer page contains four panes, as shown in the following figure, and described in the following list.
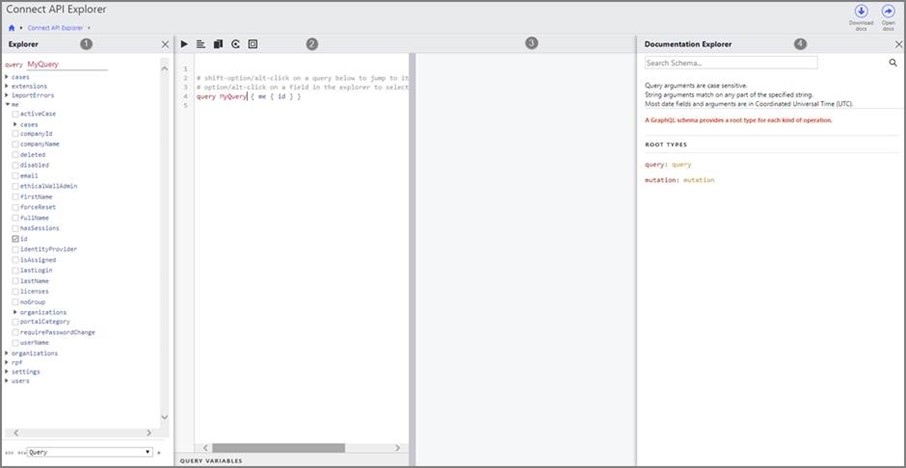
- Explorer pane: New query builder for automated assistance in constructing queries and mutations.
Note
To close the Explorer pane, click the X button. To reopen this pane, click the Show explorer button in the Editor pane. - Editor pane: Area for constructing, formatting, and running queries and mutations.
- Results pane: Contains query and mutation results.
- Documentation Explorer pane: Documentation details for all query and mutation endpoints and their associated arguments and fields.
Each time you enter the Connect API Explorer page, the Explorer pane will begin with a default query under the “Me” argument related to data associated with you, the user.
To access the API through the Connect API Explorer page, and to manipulate queries and mutations:
Note
This example creates a basic query filtering on all active cases and sorts them by case name in ascending order.-
On the Portal Home page, under Portal Management, click Connect API Explorer.
-
To create a new query or mutation, in the Add New field, at the bottom of the Explorer pane, select Query or Mutation from the list, and then click the + sign.
The new blank query or mutation will appear in the Explorer and Editor panes with a default name.
When you modify data through the Connect API Explorer page, you change the data in the application. We recommend that you test any mutations in a non-production environment or using non-production data. -
To copy an existing query or mutation, to the right of the Name field, hover over and click the Copy button, as shown in the following figure.
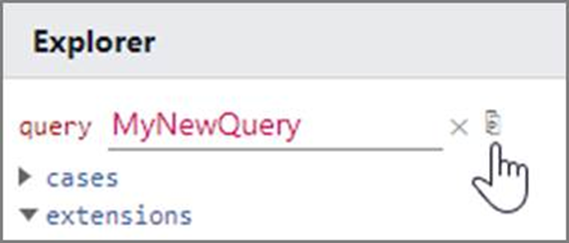
A duplicate copy will appear under the existing queries and mutations in the Explorer and Editor panes.
-
Enter a unique Name. The change appears in the Explorer and Editor panes.
Note

You can manipulate multiple queries and mutations simultaneously by giving each operation a unique name. It is best to give your query or mutation a unique name to help identify their function. -
In the Explorer pane, expand the cases list by clicking the expand arrow, as shown in the following figure.
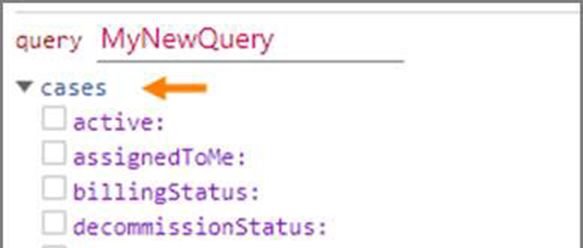
The cases argument is added to the Editor pane with the proper syntax.
Note
Filter fields appear in purple and are used for filtering the returned data by a specified value you enter. Fields that appear in blue are used for returning any data value within that field.Warning
If you close an expanded list in the Explorer pane, and already have several fields and filters selected, closing the list will delete the selections from the query or mutation. However, those selections are cached, and by expanding the list again, the selected fields and filter data will reappear.-
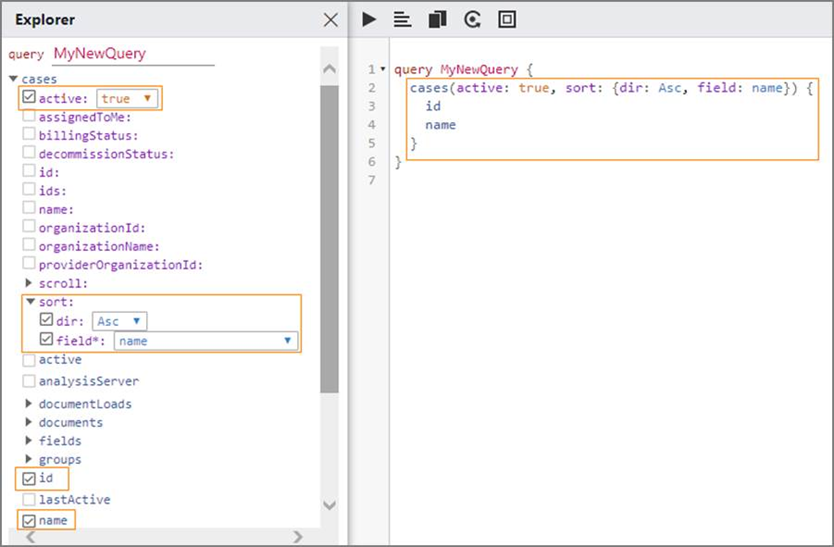
Select the check boxes for the id and name fields shown in blue text, shown in the following figure.
The fields appear in the Editor pane in the proper location and surrounded by the correct syntax.
-
Select the check box for the active field shown in purple text, shown in the following figure, and then select true.
Note
When filtering with multiple values, such as multiple IDs, the builder does not support arrays. You must enter the multiple filtering values manually in the Editor pane. -
Expand the sort field shown in purple text, and then do the following.
a. Select the check box for the dir field, and then select Asc.
b. Select the check box for the field* field, and then select **name**.
The asterisk (*) following a field name indicates a required field. If selected, this field must contain a data value to filter on.
The query now contains all of the selected fields and filter options, as shown in the following figure.
-
Optionally, you can manually enter queries or mutations and their variables in the Editor pane. When entering them manually, be aware of the following:
Note
For more information about variables, see Substitute placeholders for static data: variables.- To see a list of fields, on a blank line in the Editor pane, press Ctrl + Spacebar. Press the arrow keys to highlight a value, and then press Enter to select the value.
Note
The query and mutation syntax is case-sensitive. And when entered in the Editor pane, the check boxes are automatically selected in the Explorer pane. - When entering multiple queries or mutations, use the format of query yourQueryName { } or mutation yourMutationName { } to keep each API call unique.
- If a red squiggly line appears underneath any of the text, it means that schema validation has found an error in the API call. Hover over the red squiggly line to see more information about the error, as shown in the following figure.

Note
For more information about valid API structure, see the reference documentation. - To see a list of fields, on a blank line in the Editor pane, press Ctrl + Spacebar. Press the arrow keys to highlight a value, and then press Enter to select the value.
-
To delete the query or mutation and start over, hover over the name in the Explorer pane, and then click the X button, as shown in the following figure.

The query or mutation is deleted from both the Explorer and Editor panes.
-
To run a query or mutation, in the Editor pane, click the Execute query button.
Note
If you have multiple queries and mutations, a list will appear where you can select one for execution. However, all queries and mutations must be valid to run that selection successfully.
The results will appear in the Results pane.
For more information about queries, see Request data: queries. For more information about mutations, see Modify data: mutations. For examples of queries or mutations, see Data retrieval query examples or Import mutation examples.
Feedback
Was this page helpful?
Thank you for your feedback.
Thank you for your feedback.