Microsoft Azure Tenant Configuration
4 minute read
The Nuix connector for Microsoft Office 365 utilizes the Microsoft Graph API to authenticate and interact with the Office 365 suite of applications. Authentication is facilitated by creating an Azure application with appropriate permissions on the Azure Active Directory (AD) tenant where Microsoft Office 365 is hosted.
Important
The Azure application described in the following sections must be registered and approved by Microsoft before the Nuix connector endpoint can be used. Details about receiving this protected API access approval is detailed later within this tutorial.Microsoft Graph Authentication Methods
The following authentication methods are implemented within this topic:
- OAuth 2.0 client credentials grant flow.
- Used for certificate and client secret-based authentication.
- Learn more: https://docs.microsoft.com/en-us/graph/auth-v2-service#4-get-an-access-token
- OAuth 2.0 Resource Owner Password Credentials (ROPC) grant flow.
- Used to retrieve Teams calendar data.
- Learn more: https://docs.microsoft.com/en-us/azure/active-directory/develop/v2-oauth-ropc
Use the steps in the following sections to create and register an Azure application with the appropriate permissions to provide a method of authentication for your Azure tenant.
Registering a New Application with Azure
To register and configure an Azure application that can be used by Nuix to authenticate with your Microsoft Office 365 Instance:
Important
This procedure must be performed by a user within your Azure tenant that has Global Administrator privileges.-
Access the Microsoft Azure portal (https://portal.azure.com).
-
Log into the portal using an account that has been assigned the role of Global Administrator for your tenant.
-
If your account is associated with multiple tenants, switch to the Active Directory tenant where Microsoft Office 365 is configured. To do this:
-
Click on your account name from the upper right side of the Azure portal.
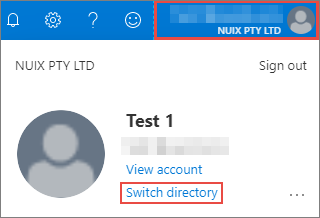
-
Click Switch directory from the pane.
-
Choose an available directory from the menu.
-
-
From the Azure portal Home page, select Azure Active Directory from the Azure services menu.

-
From the left navigation panel, select App registrations.
-
Click New registration from the top navigation bar within the view.

-
Provide the following details to register the application.
- A descriptive name for the application.
For example:
Nuix Authentication - Under Supported account types, select Accounts in this organizational directory only (Single tenant).
- Click Register to register the new app.
- A descriptive name for the application.
For example:
-
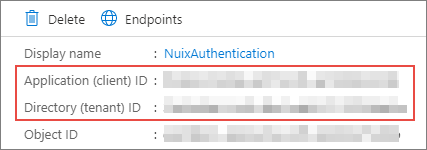
After registering the application, the Overview page displays. Copy the following displayed values for later use:
-
Application (client) ID
-
Directory (tenant) ID
-
-
Proceed to the following section to set up authentication.
Configuring an Authentication Method
After successfully registering your Azure application, an authentication method must be configured. The method that is chosen will determine how the Nuix connector authenticates with Microsoft Office 365.
To configure an authentication method:
-
From the Overview page of your Azure application, select Certificates & secrets from the left navigation panel.
Tip
To access the Overview page from the Azure portal Home page, select Azure Active Directory from the Azure services list, then App registrations from the left navigation panel. Finally, click on the name of the new application to access its Overview page.Two types of authentication are available for Azure Active Directory applications:
- Certificate-based authentication
- Password-based authentication (application secret)
Both methods are supported by the Nuix Connector for Microsoft Office 365 and provide the same level of access to the Azure tenant.
-
Implement one of the methods using the procedures in the following sections.
Certificate-Based Authentication
To configure certificate-based authentication, the selected certificate must meet the following requirements:
- PKCS#12 based certificate store.
- Public key (.CER, .PEM, or .CRT) Applied within Azure.
- Private key (.PFX or .P12) Applied within the Nuix Connector endpoint.
- RSA key algorithm
- 2048 key size
Note
The certificate store being used must not include more than one key value pair.To configure certificate-based authentication within your Azure tenant:
-
From the Certificates & secrets panel, locate the Certificates section and click Upload certificate.
Use the file explorer to select a valid certificate (public key) with either a
.CER,.PEM, or.CRTfile extension.Note
Certificates should be obtained and signed by a trusted Certificate Authority (CA). If necessary, self-signed certificates can be used for testing purposes only. -
Click Add to upload and apply the certificate.
-
Proceed to the next topic to apply API permissions to the Azure application.
Password-Based Authentication
To configure password-based authentication within your Azure tenant.
-
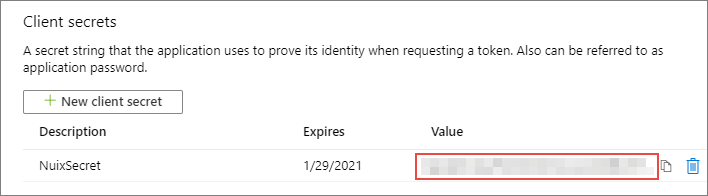
From the Certificates & secrets panel, locate the Client secrets section and click New client secret.
-
Provide a description for the new client secret.
-
Select an expiration period for the client secret.
Note
When the client secret expires, this process must be repeated to create a new client secret for your application. -
Click Add to generate the new client secret.
-
Copy the generated value to a secure location. The client secret is required when making requests to the Office 365 connector endpoint.
Warning
The client secret value is only visible at the time of creation. If lost, a new secret key must be generated for the application. -
Proceed to the next topic to apply API permissions to the Azure application.
Feedback
Was this page helpful?
Thank you for your feedback.
Thank you for your feedback.