Portal Management Reports
16 minute read
The Reports feature is available in the Portal Management section. This feature allows system administrators and portal administrators to view the following aggregate data:
- Summary: View a graphical report about an organization’s use of the application. This report summarizes the information provided on the other Reports pages.
- Usage: View aggregate data for all cases or for a specific case.
- Hosted Details: View information about hosted file sizes for all of the cases that you administer or for specific cases.
- Users: View information about the users for all of the cases that you administer or for a specific case.
You can also download reports. For more information, see Download a Portal Management Report.
For information about how to change the time zone for a Hosted Details or Usage report, see Change the time zone for reports.
Note
Case administrators who are portal users can view data and download reports for the cases that they administer.Summary Report
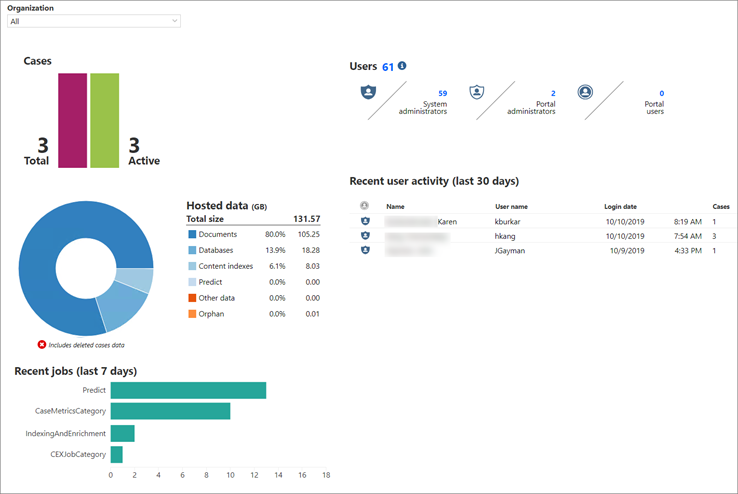
The Summary Report provides a graphical representation of information about an organization’s use of the application. This report summarizes the information provided on the other Reports pages.
The Summary page is always available to system administrators. If organization security is enabled for the portal, the page is available to portal administrators as follows:
- If the user is a portal administrator member of a provider organization, information about the user’s organization and any client organizations is available on this page.
- If the user is a portal administrator of a non-provider organization, only information about the user’s organization is available on this page.
To access and work with the Summary page:
-
On the Portal Home page, under Portal Management, click Reports.
The Summary page appears as the default page.
-
On the Summary page, in the Organization list, select an organization.
Note
In the Organization list, the None option is always available to system administrators. The None option is available to portal administrators only if organization security is disabled for the portal. -
(Optional) By default, data for deleted cases is excluded from the report. To include data for deleted cases in the report, do the following:
-
On the toolbar, click the Settings button.
-
In the Settings dialog box, select Include, and then click OK.
If you select the Include option, the data for deleted cases is included in the Cases bar chart, the Recent user activity table, the Hosted data table, and the chart next to the Hosted data table.
Note
Below the chart, a message indicates if the chart includes data for deleted cases.
-
-
View the following information:
- Cases: Displays the total number of cases and the number of active cases in the organization.
Note
Cases that have been deleted because they have been decommissioned are included in the Total case count, but not in the Active case count. - Hosted data: Displays a chart showing the breakdown of the total hosted data size for all cases in the selected organization. This section includes a legend with percentages and counts (in GB) for hosted data.
Note
Cases that have been deleted because they have been decommissioned are not included in the Hosted data (GB) counts. - Recent jobs: Displays a horizontal bar chart showing the jobs that ran in the last seven days. If no jobs ran in the last seven days, this section does not display any results. The colors of the bars indicate the job status. Hover over a bar to view the status of the job as well as the number of jobs.
- Users: Displays the number of users in the organization and the roles of those users. The number does not include users that have been deleted, disabled, or that are unlicensed. Click the links to view the users.
- Recent user activity: Displays the user activity for the last 30 days and provides the following information: Name, user name, login date and time, and the number of cases that the user logged in to in the last 30 days. If a user did not log in to any cases, the value is zero (0).
Tip
To display a tooltip that shows the case name and the last accessed date for all cases in the organization that the user accessed in the last 30 days, hover over a row in the Cases column.Note
For failed login attempts, the login date and time appear in red. - Cases: Displays the total number of cases and the number of active cases in the organization.
Gather or update case metrics
On the Usage and Hosted Details pages, the metrics update periodically, and not in real time, if you scheduled an indexing and enrichment job or a gather case metrics job. On the Users page, some of the numbers update in real time, but others require that you run one of these job types.
If no jobs are scheduled, we recommend that you schedule a gather case metrics job on a weekly or monthly basis. For information about how to schedule a gather case metrics job, see Add a scheduled job.
If you need to gather and update case metrics more frequently, you can schedule an indexing and enrichment job, which also includes updates to case metrics.
Note
An indexing and enrichment job updates case metrics only for folders that correspond to levels. To scan all folders in the file system, run a gather case metrics job. If you want to update case metrics using a previously scheduled indexing and enrichment job, you must delete the existing job, and then create a new job that includes the Update case metrics option.Usage report
You can view aggregate data for all of the cases that you administer or for specific cases in the Usage report.
To access this page:
- On the Portal Home page, under Portal Management, click Reports.
- On the Reports page, in the navigation pane, click Usage. The Usage page appears.
- You can display the total usage summary for a specific date or for a date range. If you change the date, click Apply to update the table.
You can filter columns, and hide and display columns in this table. For more information, see Filter data in the Portal Management Reports.
The following columns are available in the Usage report. You can hover over most of the column headings to view a description.
-
Status: Indicates whether a case is active, inactive, or is deleted because it was decommissioned. If a case is active, no icon appears. If a case is inactive, an icon appears in this column. To see when an inactive case was last active, hover over the inactive icon.
Note
You can use the column filter to include or filter out deleted cases from the reports that appear on this page. Deleted cases are filtered out by default. You can hover over the icon to see when a case was deleted. -
Data availability: The color-coded calendar icons in this column indicate the data aging and availability as follows:
Tip
Hover over the calendar icons to view details.- If you select the Total as of option, the calendar icons indicate the following:
- Red calendar icon: No data is available for the case. Run a gather case metrics job, or run an indexing and enrichment job with the update case metrics option selected.
- Yellow calendar icon: Data is available, but it is more than 30 days older than the specified date.
- Green calendar icon: Data is available and is less than 30 days old for the specified date.
- If you select the Net difference between option, the calendar icons indicate the following:
- Red calendar icon: No data is available for the case for the specified date range. Run a gather case metrics job, or run an indexing and enrichment job with the update case metrics option selected.
- Yellow calendar icon: Data is available for some dates for the specified date range, but data is missing for either the specified start date or the specified end date, or both.
- Green calendar icon: Data is available for the specified start and end dates.
- If you select the Total as of option, the calendar icons indicate the following:
-
Case: A list of all cases. You can filter and sort this list.
-
Non-billable: Indicates if the case is billable or non-billable. A dot in this column indicates that the case is non-billable. You can filter the column to set the value to Non-billable = Yes or No.
-
Parent Organization: Displays the provider organization.
-
Organization: Displays the cases for your suborganization.
-
Description: The case description.
-
Base documents: Number of base documents.
-
TIFFed pages: Number of pages generated by imaging (.tiff, PDF, or .jpg).
-
OCR pages: Total number of pages of documents submitted for optical character recognition (OCR) processing.
-
Translation documents: Number of machine-translated documents (using the Google or Microsoft service).
-
Transcribed audio minutes: The number of transcribed audio minutes for a case.
-
Ingestion count: Number of ingestions associated with documents in the case.
-
Ingestion documents: Number of documents in the case that were loaded using the Ingestions feature.
-
Ingestion expanded size (GB): Total size of expanded items of ingestions jobs that succeeded or succeeded with warnings.
-
Ingestion loaded size (GB): Total size of the file size associated with documents in the case that were loaded using the Ingestions feature.
-
Import count: Number of imports associated with documents in the case.
-
Import documents: Number of documents in the case that were loaded using the imports feature.
-
Import size (GB): Total file size of documents in the case that were loaded using the imports feature.
-
Production count: Number of locked productions.
-
Production documents: Number of production renditions.
-
Production pages: Number of pages associated with production renditions.
Hosted Details report
In the Hosted Details report, you can view information about hosted file sizes for all of the cases that you administer or for specific cases.
To access this page:
- On the Portal Home page, under Portal Management, click Reports.
- On the Reports page, click Hosted Details. The Hosted Details page appears.
- You can display the total usage summary for a specific date or for a date range. If you change the date, click Apply to update the table.
You can filter columns, and hide and display columns in this table. For more information, see Filter data in the Portal Management Reports.
The following columns are available in the Hosted Details report. You can hover over most of the column headings to view a description.
-
Status: Indicates whether a case is active, inactive, or is deleted because it was decommissioned. If a case is active, no icon appears. If a case is inactive, an icon appears in this column. To see when an inactive case was last active, hover over the inactive icon.
Note
You can use the column filter to include or filter out deleted cases from the reports that appear on this page. Deleted cases are filtered out by default. You can hover over the icon to see when a case was deleted. -
Data availability: The color-coded calendar icons in this column indicate the data aging and availability as follows:
Tip
Hover over the calendar icons to view details.- If you select the Total as of option, the calendar icons indicate the following:
- Red calendar icon: No data is available for the case. Run a gather case metrics job, or run an indexing and enrichment job with the update case metrics option selected.
- Yellow calendar icon: Data is available, but it is more than 30 days older than the specified date.
- Green calendar icon: Data is available and is less than 30 days old for the specified date.
- If you select the Net difference between option, the calendar icons indicate the following:
- Red calendar icon: No data is available for the case for the specified date range. Run a gather case metrics job, or run an indexing and enrichment job with the update case metrics option selected.
- Yellow calendar icon: Data is available for some dates for the specified date range, but data is missing for either the specified start date or the specified end date, or both.
- Green calendar icon: Data is available for the specified start and end dates.
- If you select the Total as of option, the calendar icons indicate the following:
-
Case: A list of all cases. You can filter and sort this list.
-
Non-billable: Indicates if the case is billable or non-billable. A dot in this column indicates that the case is non-billable. You can filter the column to set the value to Non-billable = Yes or No.
-
Parent Organization: Displays the provider organization. This column does not appear by default.
-
Organization: Displays the cases for your suborganization.
-
Description: The case description.
-
Base documents (GB): Total file size of image files, native files, and content files that are associated with base documents as well as non-document entity items.
-
Production renditions (GB): Total file size of image files, native files, and content files that are associated with production renditions.
-
Databases (GB): Total size of the SQL databases associated with the case.
-
Elasticsearch index (GB): If a case uses an Elasticsearch index, the total size of the Elasticsearch index associated with the case.
-
Content index (GB): Total size of the content indexes associated with the case.
-
Predict (GB): Total size of the predict data associated with documents in the case.
-
Orphan (GB): Sum of the file size of files on the file system that were not accounted for by documents or indexes.
-
Subtotal (GB): A subtotal of the active data, which includes the date in the following columns: Base documents (GB), Production renditions (GB), Databases (GB), Content index (GB), Predict (GB), and Orphan (GB).
-
Max data (GB): The maximum active hosted data size for a case within a specified date range. Captures the following data: sum value of base documents, production renditions, databases, Elasticsearch index, content index, and Predict data.
Note
This column also includes a calendar icon. Hover over the calendar icon to display the date of the maximum value. If you download a report, it includes the values for the maximum active hosted data size for a case, as well as the date the maximum active hosted data size was captured. -
File transfer data (GB): The sum of the file size of files on the file system that were not accounted for by documents or indexes.
Note
This column no longer includes the information for archived data. This column still includes the information that was previously reported in the now retired Other data column. -
Archive data (GB): Total size of the archive repository for each case as captured by the Gather case metrics job.
-
Total (GB): Sum of the values in the currently displayed columns on the Hosted Details report, with the exception of the Missing (GB) column.
-
Missing (GB): Sum of the file size of files associated with documents in the case, but missing from the expected location in the Images folder.
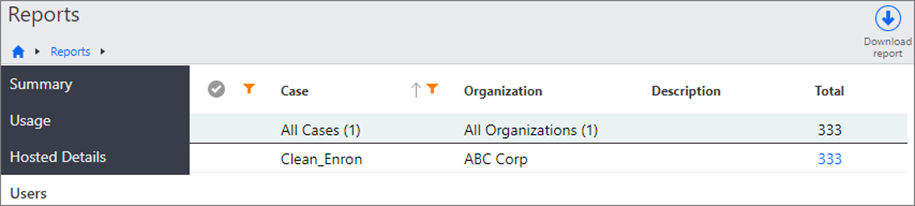
Users report
You can view information about the users for all of the cases that you administer or for a specific case in the Users report. An example of the Users report is shown in the following figure.
You can filter columns, and hide and display columns in this table. For more information, see Filter data in the Portal Management Reports. The following columns are available in the Users report. You can hover over most of the column headings to view a description.
- Status: Indicates whether a case is active or inactive. If a case is active, no icon appears. If a case is inactive, an icon appears in this column. To see when an inactive case was last active, hover over the inactive icon.
- Case: A list of all cases. You can filter and sort this list.
- Parent Organization: Displays the provider organization. This column does not appear by default.
- Organization: Displays the cases for your suborganization.
- Description: The case description.
- Total: Total number of users.
- Assigned: Number of users who are currently assigned to the case.
- Unassigned: Number of users who were previously assigned to the case but are currently unassigned.
- Licensed: Number of licensed users.
- Unlicensed: Number of unlicensed users.
- Disabled: Number of users who cannot log in to because their accounts are disabled.
To update the data in the following columns, you must run a gather case metrics job, or run an indexing and enrichment job with the update case metrics option selected:
Note
An administrator can enable the users’ accounts. For more information, see Work with User Administration. - No group: Number of users who are not members of any groups in the case.
- Last access: The last time that a user logged in to the case. Hover over a cell in the Last access column to see which user last accessed the case.
View detailed user information
If you are a system administrator or portal administrator, use the following procedure to access the Users page in the User Administration section to view detailed information about each user based on the aggregate data that appears in the Portal Management Report.
- On the Users page in the Reports section, click a linked number in the table, as shown in the following figure.
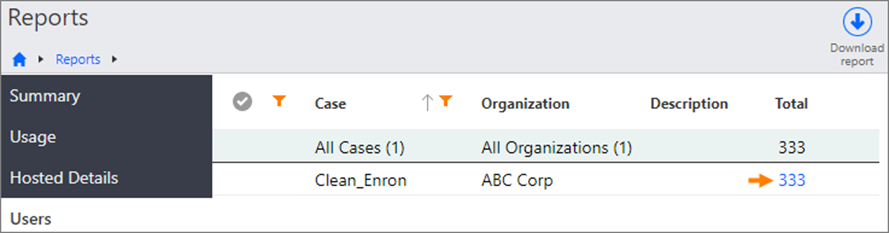
The Users page in the User Administration section opens. For information about user administration, see Work with User Administration.
Note
If you are a case administrator (and a portal user), you can see aggregate data on the Reports page, but you cannot access the User Administration section.Filter data in the Portal Management Reports
By default, data for all cases and all available metrics appears on the Portal Management Reports. You can filter the data that appears. For example, if you want to display only data related to ingestions for a specific case, you can filter by the case name and then display only the ingestion columns.
When you filter the data, the numbers in the report update accordingly.
To filter the data that appears on the Portal Management Reports:
- On the Portal Home page, click Reports, and then click the page for a report.
- To filter data, do the following:
- Hover over a column heading and then click the down arrow.
- Point to Filters, and then enter the filter criteria. For example, type a case name.
- To specify which data columns appear, do the following:
- Hover over a column heading, and then click the down arrow.
- Point to Columns, and then select from the following:
- To display a column, select the check box next to the column.
- To hide a column, clear the check box next to the column.
Download a Portal Management Report
To download data from a Portal Management Report to a spreadsheet (.csv file):
-
On the Portal Home page, click Reports, and then click the page for the report that you want to download.
-
Optionally, filter the report.
Note
The downloaded report includes the date ranges and the columns that you filtered by but does not reflect any filters based on the case name. -
Click Download report.
Change the time zone for reports
You can change the time zone for the data that appears on the Usage or Hosted Details pages from local time to Coordinated Universal Time (UTC). By default, the data appears in local time. Using UTC allows the reports to display data consistently with reports generated through the API when querying specific dates or date ranges.
To change the time zone from local time to UTC:
- On the Portal Management > Reports > Usage or Hosted Details pages, on the toolbar, click the Time zone button.
- In the Time zone dialog box, select UTC time.
- Click OK.
Feedback
Was this page helpful?
Thank you for your feedback.
Thank you for your feedback.